

Strong and flexible hip flexors will go a long way in ensuring athletic records and long-term (knee) health. Since people move less and less these days, hips get tighter and as a consequence the number of psoas stretches performed around the globe is probably at an all-time high in the present.
In this post we will explore the most effective ways to stretch your psoas, the reasons why you would want to do a psoas stretch and under which circumstances you should not stretch.
Should I do a psoas stretch?
Most of us sit all day and our bodies slowly adapt to this abuse. As a result the psoas and other hip flexors shorten and get tight. So the best way of action would be stretching right? Unfortunately, it’s not always that easy, as you have to check for strength of the psoas before doing a psoas stretch.
Checking for strength of the psoas

Here is one simple way to check whether your psoas is strong or not. With your back to a wall, you stand on one foot while elevating the knee of the other leg to above hip level (demonstrated without the wall in the picture). The foot can be a couple of inches away from the wall.
If you can hold this position for 30 seconds, your hip flexors are not likely to be weak. By doing this drill without the wall you can also check proprioception, vestibular function and gluteal strength (although it’s easier to cheat the hip flexor test by leaning back ever so slightly). You will need to squeeze the glute of the supporting leg hard to maintain proper posture.
Should your hip flexors test weak, you will have to perform a strengthening exercise right after your psoas stretch. To do that you can just do the test again. Concentrate on perfect technique and posture.
Before stretching: warm up & check soft-tissue
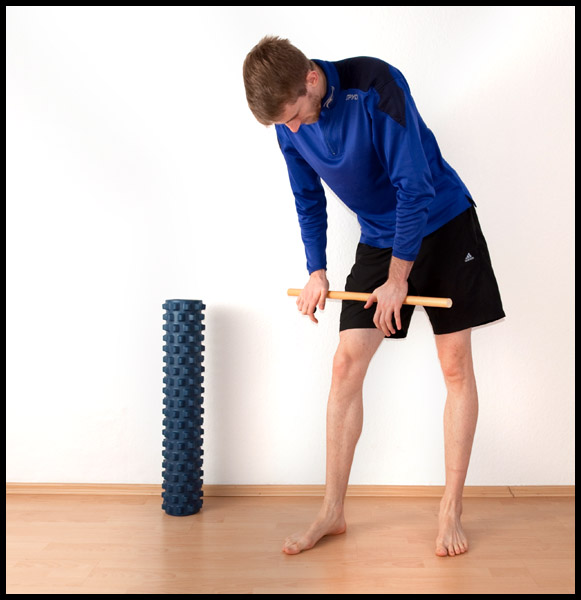
The nervous system will stop you from stretching a muscle too far if it perceives the position of the limbs as a threat to your health. If you aren’t properly warmed up your nervous system will limit your flexibility even further, making stretching a lot more difficult. This is why you need to do at least a couple minutes of light exercise before stretching. If you do something as simple as some squats and lunges, you will be a lot better off than if you were to do nothing. Next up, you will have to take care of soft-tissue restrictions as best as you can. You can use a foam roller such as the Rumble Roller or a simple stick. The Psoas is a muscle that is difficult to reach and if you have trigger points in there you could really benefit from having a physical therapist work on the muscle. If you want to take care of it yourself, you’ll just have to do the best you can with the tools you have.
The following pictures demonstrate the use of the aforementioned tools, although you’ll actually have to massage the area higher up on the thigh, somewhat to the inside. Be sure not to apply too much pressure.

The most popular psoas stretch
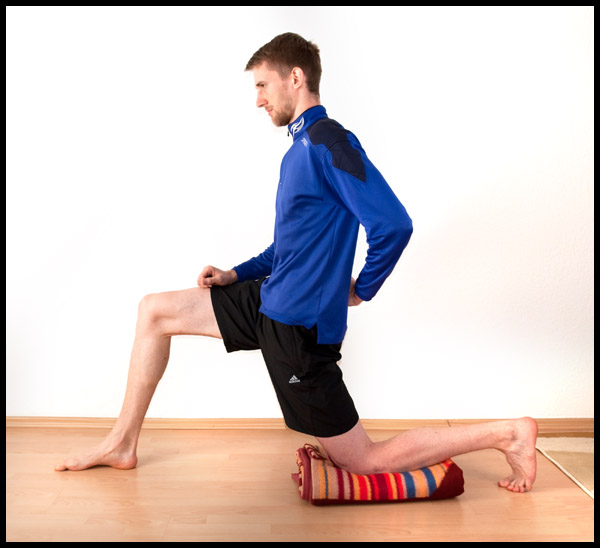
This psoas stretch is probably the most popular version out there. To perform it, you get down in a lunge position with your knee on the ground. Use something for cushioning like a blanket or a pillow. Now squeeze the glute of the rear leg and imagine driving the knee back and into the ground, while having the hip sink down and forward. Brace your abs, as if you’re bracing for a punch. Don’t let your abs protrude outwards, but work to stabilize your pelvis with your core musculature. Don’t let the pelvis tilt forward.
Personally, I prefer moving my rear leg back as I go deeper into the stretch, but you can also keep both feet stationary and just let the hip sink down and forward. Remember the following cues though:
- Keep your back straight and vertical
- Keep your hips squared up
- Keep the glute of the working leg tight
In other words: you must not lean forward or tilt your hip to the side or let your back round. You can place one hand at the lower back (see picture), so that you can tell how well you’re contracting the glute and whether your back is rounding.
According to Mike Robertson you can put more emphasis on the psoas versus the Iliacus by laterally flexing “the body in the opposite direction of the side you’re stretching”. Looking at the anatomy of the Psoas again this makes sense as the psoas attaches to the spine, whereas the Iliacus attaches to the hip.
Psoas Stretch with a stick
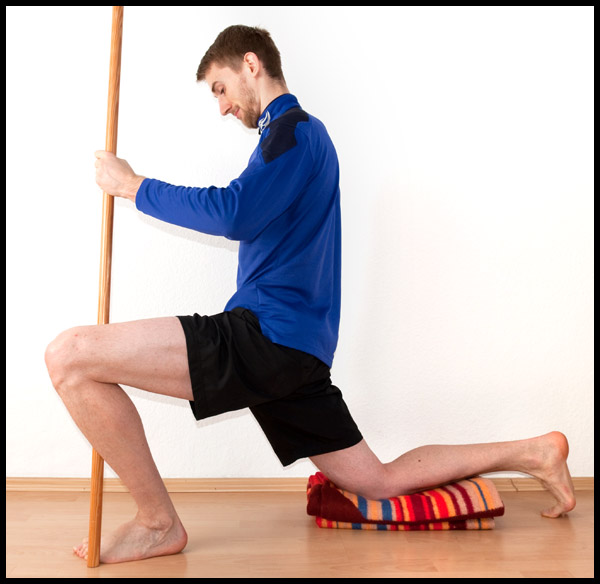
The normal version bores you? Maybe you’d like to try this psoas stretch with a stick. With this stretch you deal with your psoas while improving ankle mobility. Two birds with one stone.
To perform it, you just place a stick on the outside of your little toe and move the knee past the stick on the outside (this prevents the arch of your foot from collapsing). As you go deeper into the stretch you move your knee further past the stick. Don’t force the range of motion and keep your heel on the ground. For more detailed instructions and a video demo, check out Dr. Perry Nickelston’s ankle mobility video.
Remember to squeeze your glutes and brace your abs with this one as well.
Combined Psoas & Quadriceps Stretch

In this advanced psoas stretch you’ll not only be stretching the psoas, but the quadriceps as well. From the familiar lunge position you grab the ankle of the rear leg and pull it up towards you. Maintain a straight and vertical back. Don’t let your hip tilt forward.
There are more muscles pulling on your hip in this psoas stretch, so really be sure to squeeze your glutes hard and keep your abs braced. The more you squeeze the glute of the working leg, the more that hip flexor has to relax, because of what’s called reciprocal inhibition (i.e. the antagonist of a muscle you’re using has to relax).
Experiment with the setup for this stretch to find something that’s comfortable. I prefer getting into the lunge position, grabbing my ankle and then bending forward, lifting my rear knee into the air. Once bent forward, I place the rear knee on the ground and roll back into upright position. It may sound weird, but I found this to be the most “comfortable” way to get into the movement.
Myofascial psoas stretch #1
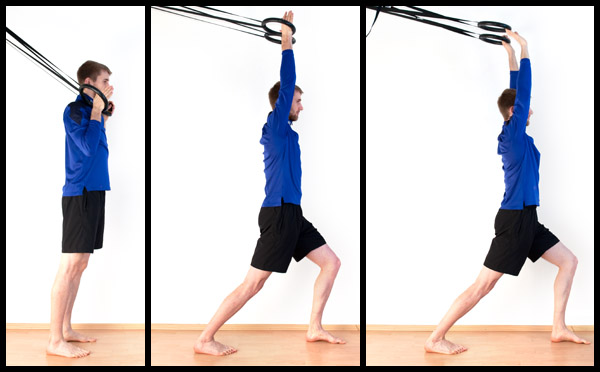
For this advanced variation, which I found in one of Dr. Perry Nickelston’s excellent blog posts, you will need a rope with some handles or a rubber band. If you have a sling trainer like a TRX or some athletic rings that’s great. If you don’t have these tools, you can improvise a setup using rubber bands or something similar.
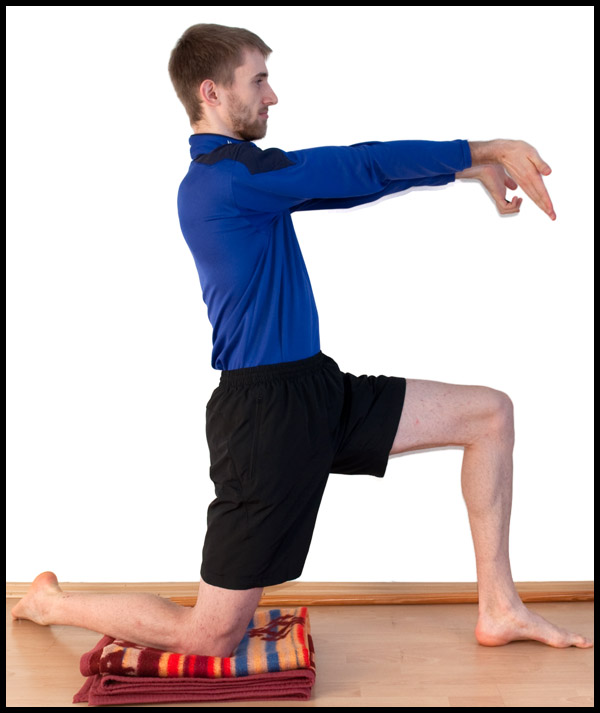
Set up with your hands inside the rings and have your hands face each other (as if playing rock, paper, scissors with yourself and both hands do paper ;-)) and slightly in front of your shoulders. Now for 9 repetitions you take a step forward, squeezing the rear glute and extending your arms overhead, with the rings/rope/handles on the ridges of your hands. Exhale as you go forward and into the end position (frame 2). After holding the end position for 2 seconds you go back to the starting position. With each repetition you should step forward a bit further and go a little deeper into the stretch.
On the tenth repetition you turn your hands so that your palms face forward and as you step forward you bend your palms backwards, effectively stretching to fascial line on the front of the body (see the picture for clarification). Hold this position for 30 seconds, but don’t hold your breath. Here are some more cues for this psoas stretch:
- Exhale as you step forward, inhale as you go back
- Pay attention to hand placement
- Squeeze your mid-back (pull your shoulder blades together)
- Don’t hold your breath
- Don’t turn your back foot in
If you want to see a video demonstration or know more about the scientific background for this psoas stretch, you can watch Dr. Perry’s Psoas Stretch video.
Myofascial psoas stretch #2
If you don’t have the option to perform the previous version and would still like to try something similar then this stretch might be just your thing. In his psoas stretch demonstration Josh Rubin points out that to stretch the entire psoas effectively, you have to internally rotate the back leg. This basically means rotating your back leg towards the inside. I have exaggerated the setup a bit in the picture, so that it’s easier to see.
As you go forward into the stretch you squeeze your glutes, keep your back straight, think about elongating your spine and put your arms up, hands facing forward and pointing down (disregard my left hand on the picture, I was holding the remote for the camera). You hold this stretch for thirty seconds and then switch to the other side. Do the stretch 3 times per side.
Josh Rubin’s advice of internally rotating the leg really makes the stretch more effective, so be sure to try it out. If you want a video demonstration and explanation, be sure to check out the link in the first paragraph.
Conclusion
There you have it: a number of iliopsoas stretches for you to choose your favorite from. Personally, I like to try everything to see what works best. I particularly enjoyed Dr. Perry’s variation, because it allows you to move around, as opposed to just being stationary like in the other psoas stretches. Josh Rubin’s advice on internally rotating the back leg was also useful, although holding the hand position is taxing. Now it’s your turn.
Original article and pictures take http://www.fix-knee-pain.com/psoas-stretch/ site
Комментариев нет:
Отправить комментарий